Task:
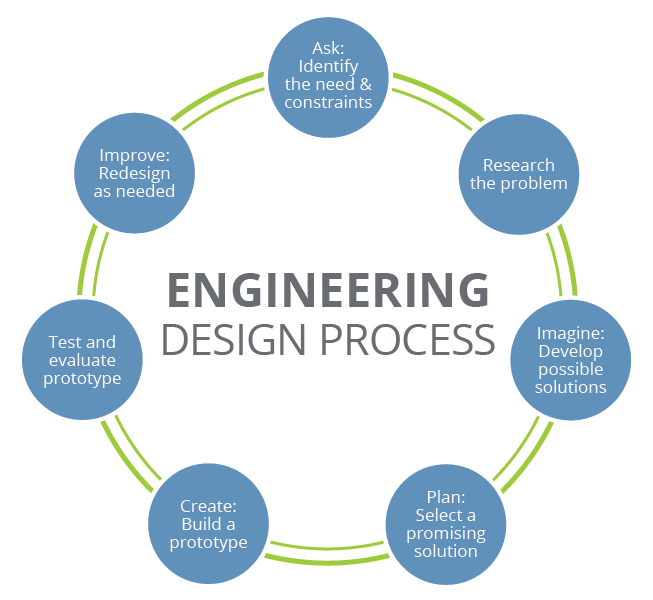
Our first task was to create a bottle opener using a 3D Cad design software, SolidWorks, and the laser cutter while applying the engineering design process. The engineering design process consists of seven steps that follows:

The first few models were modeled off of wrenches.


- Research
- Brainstorming
- Selection
- Analysis
- Prototyping
- Experimentation/Evaluation
- Redesign
These steps are to be done over and over again until the model is perfected.
Purpose:
The purpose of creating a bottle opener from scratch was not only to apply the engineering design process but also to learn about cantilevers and the deflection of when too much force is applied to the cantilever.
Limitations:
- The bottle opener may not be greater than 6" x 6" inches
- The bottle opener may not twist-off the bottle cap
- The material of the bottle opener needs to be made from a single sheet of polycarbonate
Day 1:
My partner Magnolia Pak and I began drawing out fresh ideas on paper.
The first few models were modeled off of wrenches.
The model below had teeth to grip under the bottle cap which we believed would not have enough surface area to the bottle cap.

The top left model was designed as the hole in the middle therefore needing to use three hands: two holding the bottle opener one holding the bottle. We discarded the idea as complicated.

The next few models were designed to have a ledge under the bottle cap while pushing down on the handle bar lifting the bottle cap off the bottle.

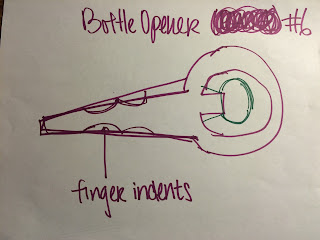
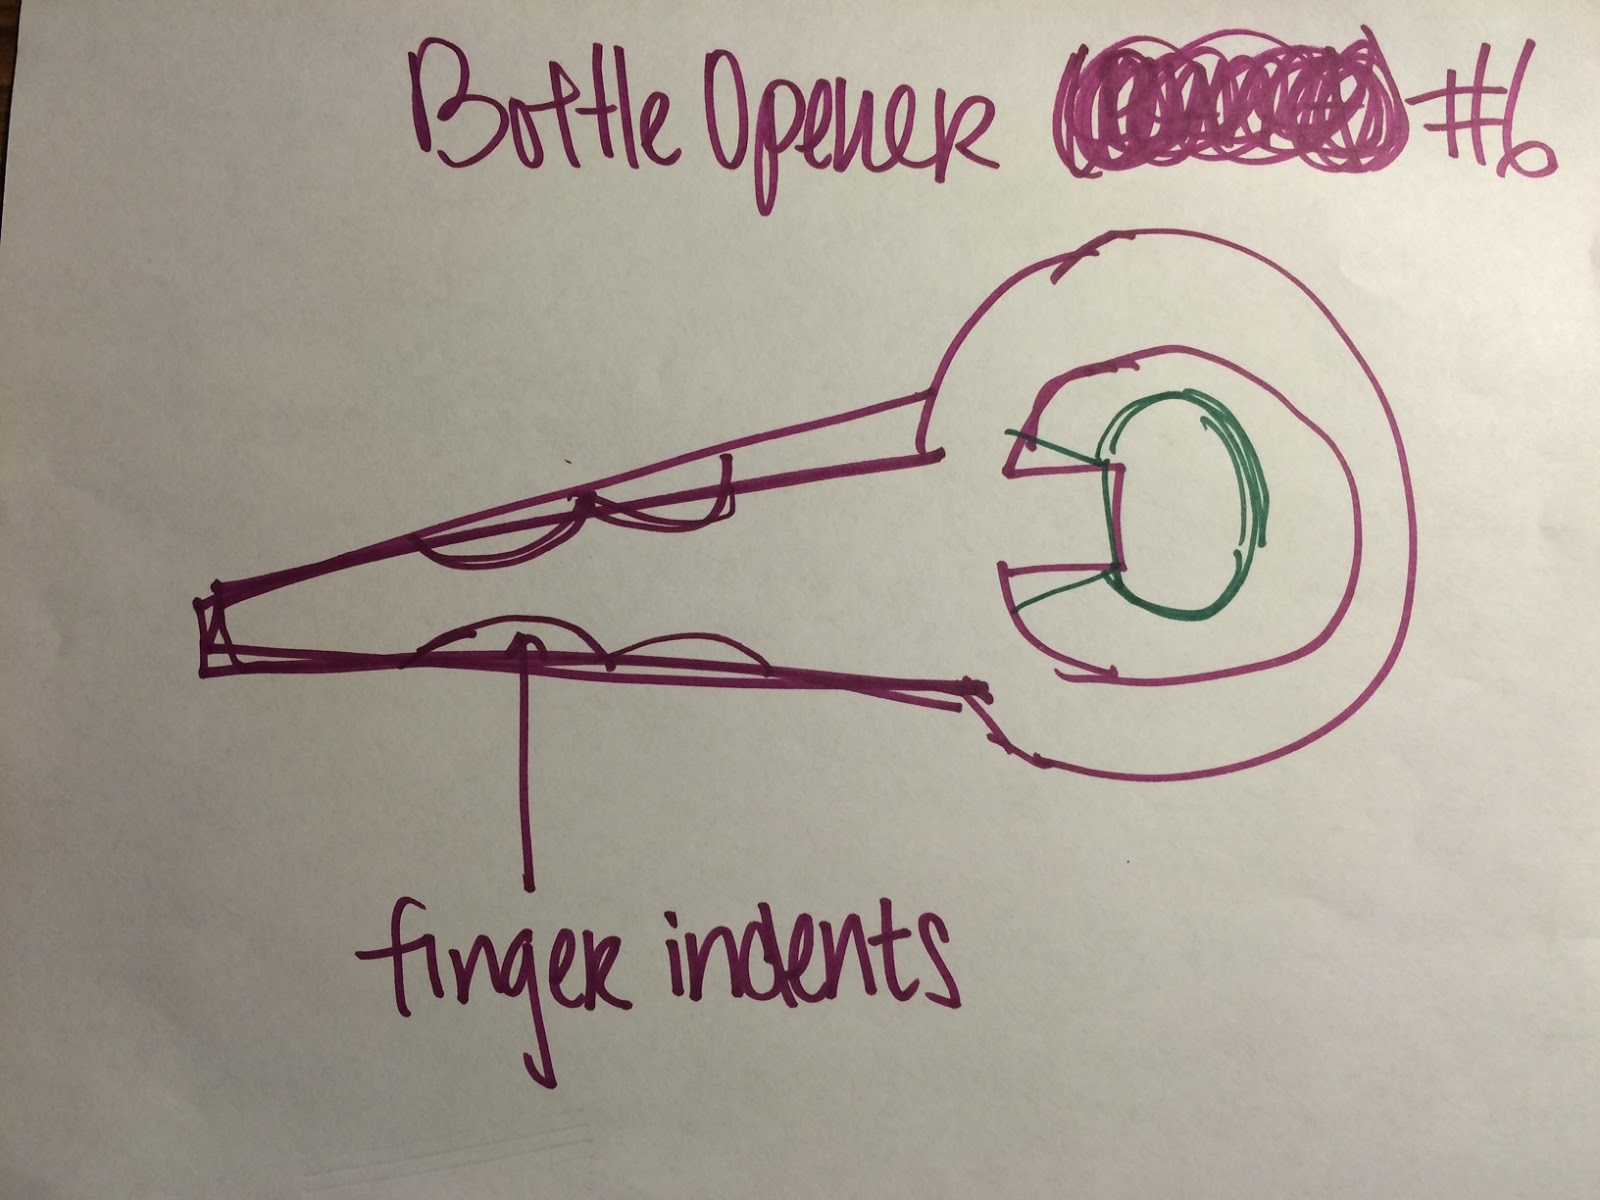
With this model on the right my partner and I changed the handle to be thicker near the cap opener with the fear of snapping the handle due to too much force applied on the handle. We also added finger indents for an easier grasp of the handle. This became our first permanent idea.

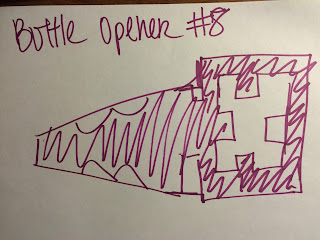
Above, we removed the outside ring believing it was unnecessary.
With the phrases "embrace all ideas" and "defer judgment," Magnolia drew a bottle opener we later decided too complicated for a simple purpose.

While debating the look of Bottle Opener #6 in my dorm room later that night, I concluded the outside ring was completely useless. But by curving it down, the top of the ring could act as a pressure pushing down on the middle of the bottle cap while the bottom digs under the cap and pushes the cap up.

This model became the model our first laser cut prototype.
Instead of the top of the ring pushing down on the bottle cap, we explored the idea of the sides pushing down on the bottle cap for more surface area. We later concluded that might not benefit us.


The top left model was designed as the hole in the middle therefore needing to use three hands: two holding the bottle opener one holding the bottle. We discarded the idea as complicated.

The next few models were designed to have a ledge under the bottle cap while pushing down on the handle bar lifting the bottle cap off the bottle.

With this model on the right my partner and I changed the handle to be thicker near the cap opener with the fear of snapping the handle due to too much force applied on the handle. We also added finger indents for an easier grasp of the handle. This became our first permanent idea.


Above, we removed the outside ring believing it was unnecessary.
With the phrases "embrace all ideas" and "defer judgment," Magnolia drew a bottle opener we later decided too complicated for a simple purpose.

While debating the look of Bottle Opener #6 in my dorm room later that night, I concluded the outside ring was completely useless. But by curving it down, the top of the ring could act as a pressure pushing down on the middle of the bottle cap while the bottom digs under the cap and pushes the cap up.
This model became the model our first laser cut prototype.
Instead of the top of the ring pushing down on the bottle cap, we explored the idea of the sides pushing down on the bottle cap for more surface area. We later concluded that might not benefit us.
Day 2:
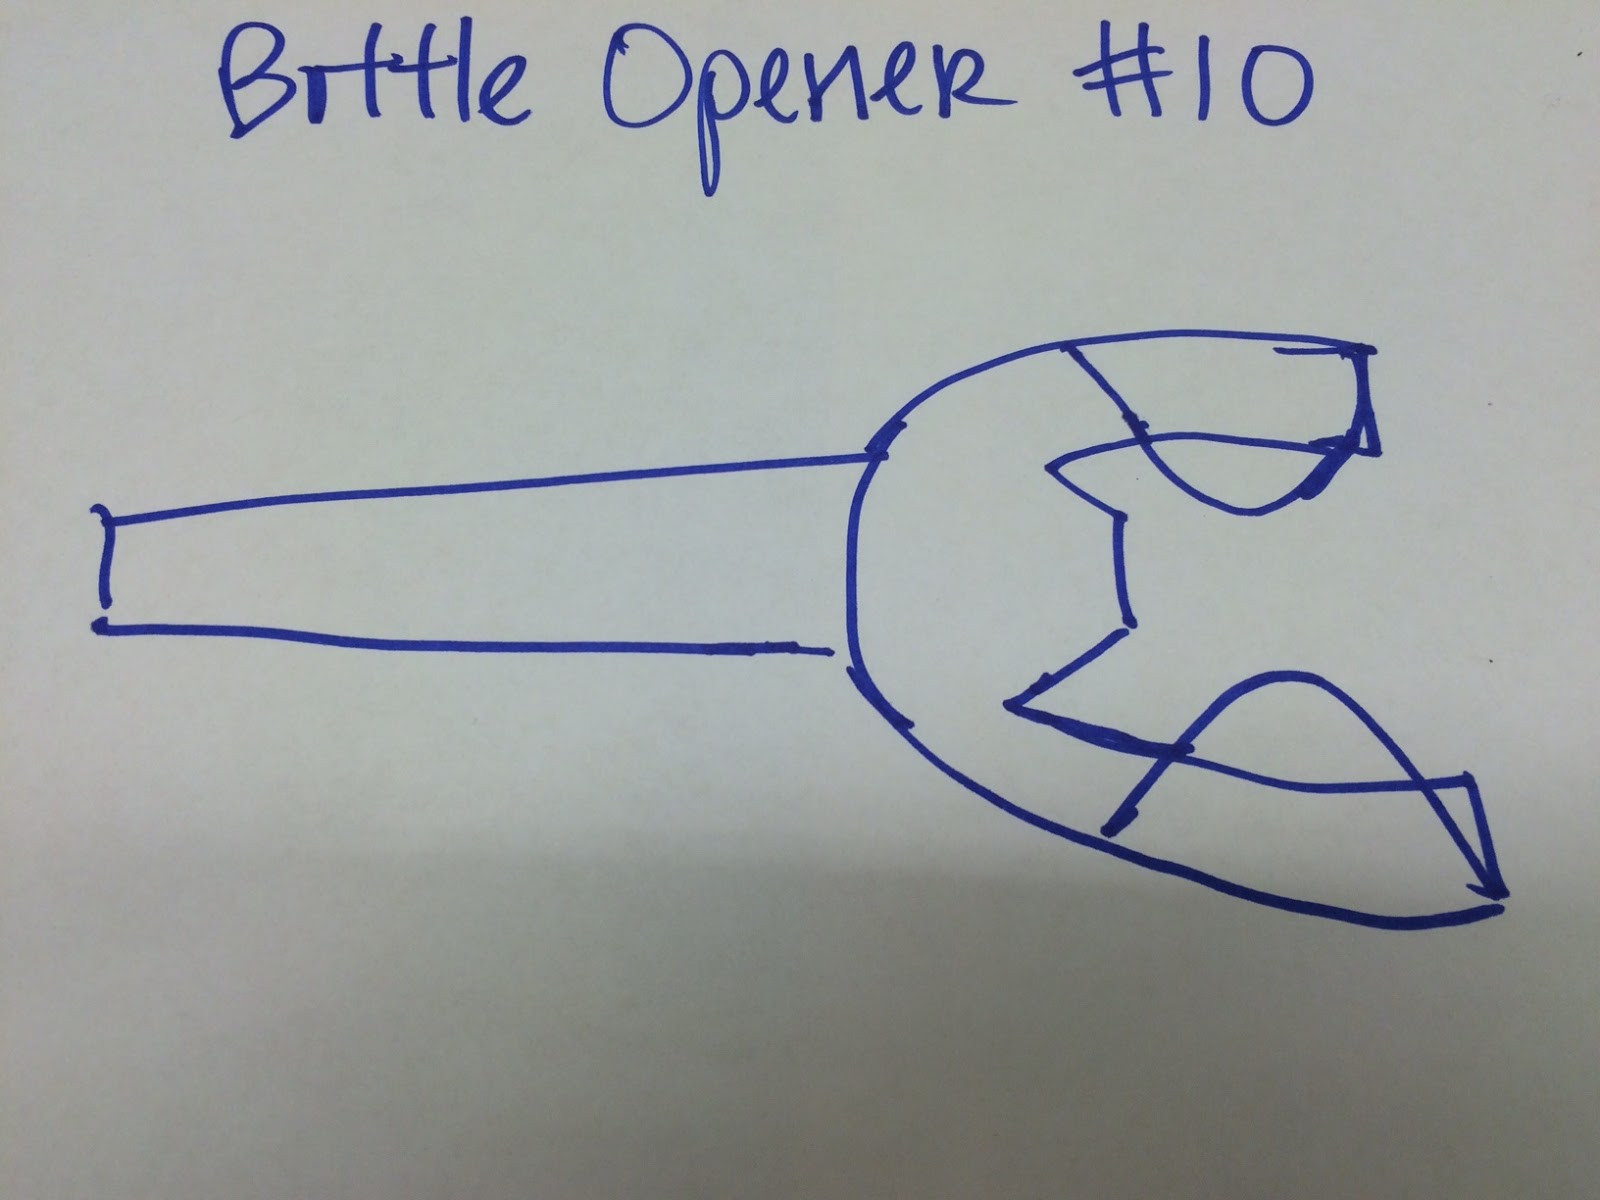
My partner and I met in the engineering lab to cut out our second permanent bottle opener, Bottle Opener # 9. The picture below are the two foam core models we created from Bottle Opener #6 and Bottle Opener #9.

Day 3:
Using SolidWorks, my partner and I designed a 3D model of our bottle opener. Below is our first laser cut model. While designing and sketching in SolidWorks, we skipped curving edges for a more rounded design and changed the look of the handle to avoid a magnifying glass look.

Day 4:
We decided to curve the part of the bottle opener where it will be touching the bottom of the bottle cap for more surface area. There is no picture available but the curve was too tight and we decided to make a third model with a wider curve.
Day 5:
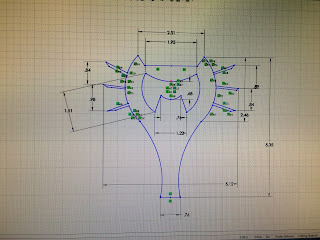
Our third and final model came with a cat design as our fun side project.
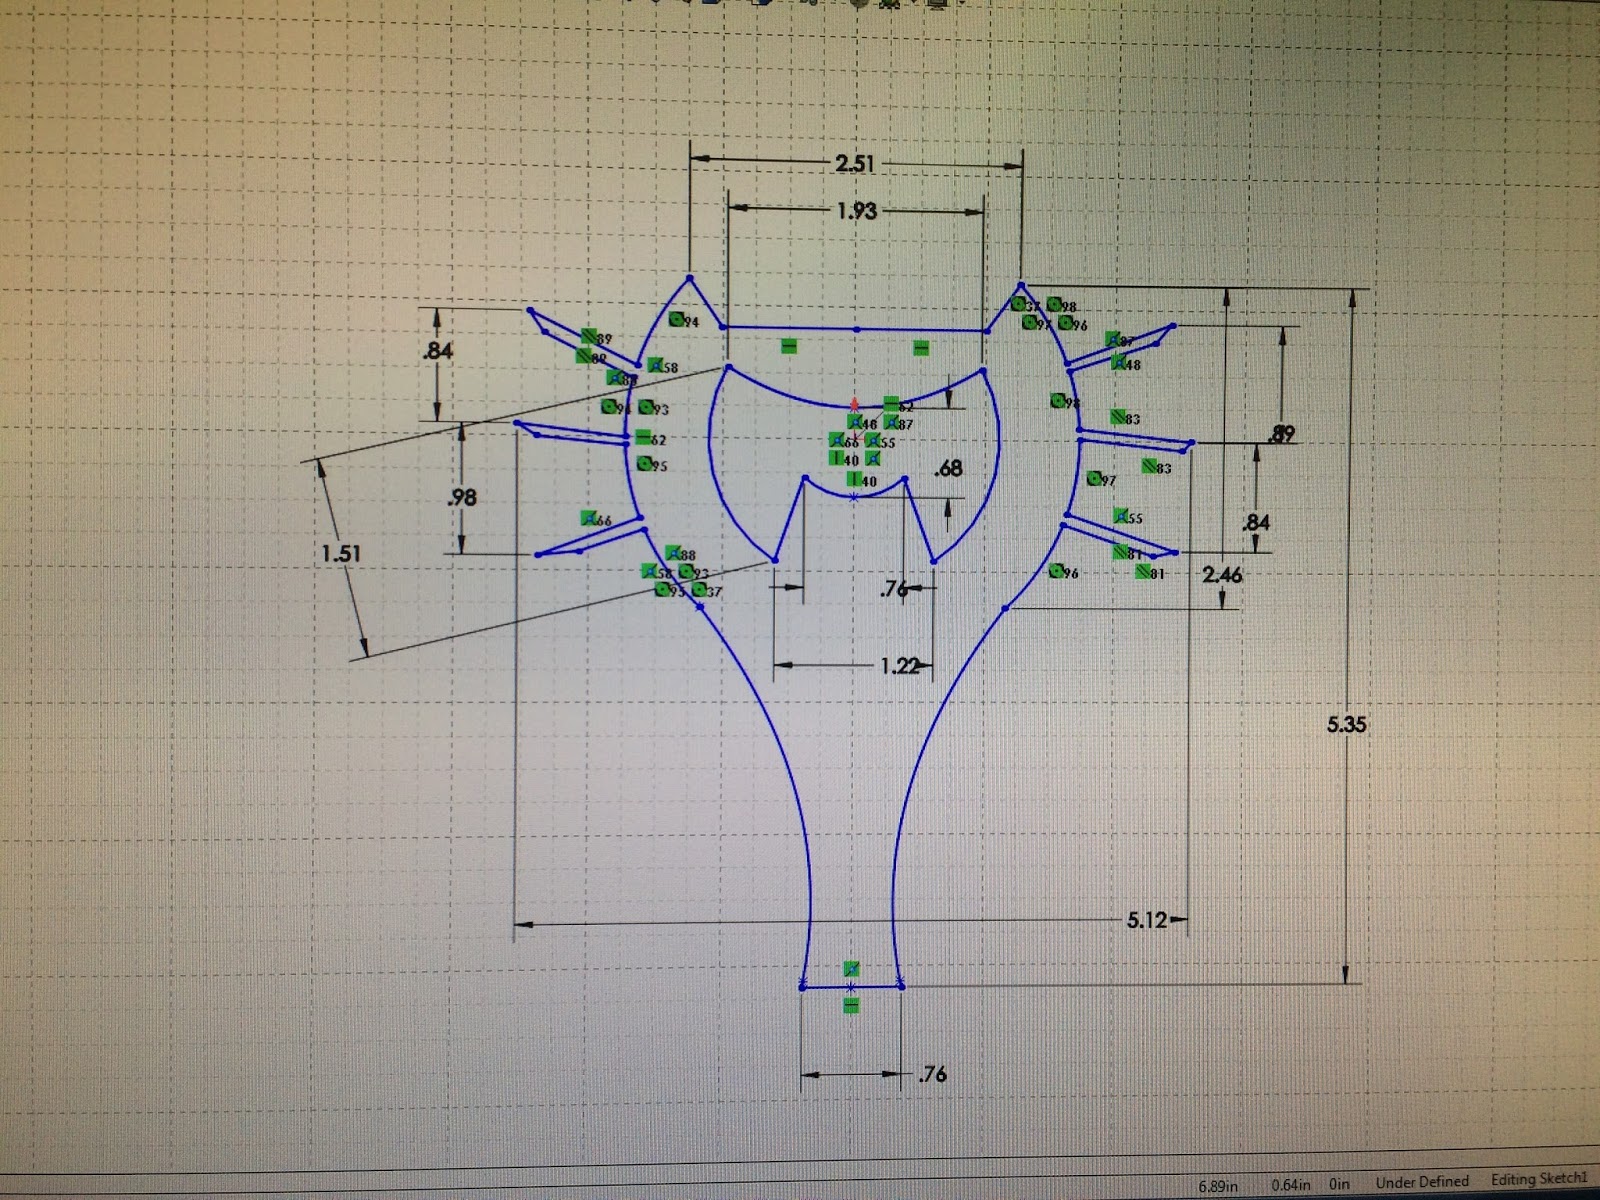
Here is our model in SolidWorks, with the multiple dimensions ensuring perfect fit around the bottle cap and for the correct 6" x 6" length.

The picture to the right is our third and final model.
In SolidWorks sketch, we drew eyes at the top and the word "meow" adding whiskers and a collar and bell beneath. With difficult lighting, we could not capture a picture clearly showing the engravings.
Idea of the Bottle Opener:
With part of the bottle opener under the cap as a leverage and another on the top of the cap, we would use our thumb to push down on the mouth of the opener and the bottle opener would act as a lever, with our hand applying the force.Further Improvements:
If our product were to be mass manufactured, I would widen the curve that fits under the bottle cap. When we measured the diameter, Magnolia and I did not take into account the angle of which we would angle the bottle cap opener to fit under the bottle cap. By widening the curve, it would ensure a more secure and easy fit. We would also change the material to be metal or stainless steel for less chipping and less stress applied to the material while using the bottle opener.
Your design is so cool! I love how you added whiskers and engraved eyes and meow on it!
ReplyDelete